Diferencia entre revisiones de «Cuenta Premium/Administrador de Cuenta»
| Línea 134: | Línea 134: | ||
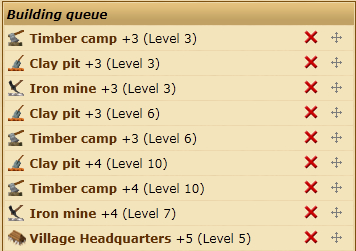
Los elementos de ''la cola de construcción'' muestran que el edificio sera mejorado, cuántos niveles debe ser actualizado, y el nivel del edificio ''después'' que las mejoras hayan terminado. | Los elementos de ''la cola de construcción'' muestran que el edificio sera mejorado, cuántos niveles debe ser actualizado, y el nivel del edificio ''después'' que las mejoras hayan terminado. | ||
Puede eliminar las actualizaciones de la cola haciendo clic en el icono | |||
[[File:delete.png|link=|alt=Cross]]. Si desea cambiar el orden de la cola puede hacer clic y arrastrar el icono | |||
[[File:sorthandle.png|alt=Sorting|link=#]]. | |||
'''However, unlike other sections of the game your deleted/rearranged queues are not immediately saved. You need to click on the "Save" button below to save your changes! You also need to click "Save" after adding new orders to the queue.''' | '''However, unlike other sections of the game your deleted/rearranged queues are not immediately saved. You need to click on the "Save" button below to save your changes! You also need to click "Save" after adding new orders to the queue.''' | ||
Revisión del 11:02 8 jun 2011
El Administrador de cuentas es una extensión pagada de la cuenta premium, diseñado para ayudar a manejar sus pueblos cuando usted tiene una cuenta más grande. Como tal, sólo está disponible una vez que usted tenga un mínimo de 20 pueblos.
Puede activar el Administrador de cuentas usando sus puntos premium. Para ello, haga clic en el menú "Premium" en el juego, e ir a "Administrador de cuenta.
Visión General
La Visión General del Administrador de cuentas, proporciona información sobre el estado de su administrador de cuenta y lo que está haciendo actualmente. Cada casilla contiene información sobre una parte diferente de su administrador de cuenta, y usted puede hacer clic y arrastre alrededor de la pantalla para ponerlas en el orden que prefiera.
Saqueos mas recientes
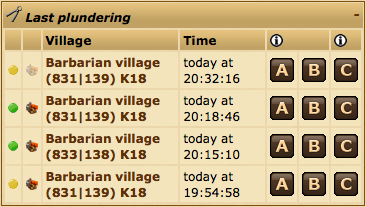
Este widget se puede utilizar junto con el Asistente de Granjeo para enviar con facilidad los ataques de granjeo a los pueblos saqueados recientemente. Muestra pueblos bárbaros que recientemente se han atacado y saqueado los recursos. Para más información sobre los iconos A, B y C, vea Ayuda del Asistente de Granjeo.
Visión general del pueblo
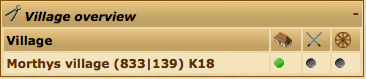
En la visión general del pueblo, los puntos de color indican el estado de su administrador de tropas, administrador de pueblos y administrador de mercado. Un punto verde indica que el administrador está activo en el pueblo. Un punto gris muestra las asignaciones que no están planificadas, y un punto amarillo indica que el pueblo se está manejando, pero el administrador se encuentra en pausa.
Haciendo clic en un punto verde o amarillo hará una pausa / reiniciar el administrador para un pueblo, y hacer clic en un punto gris lo llevará a la pantalla de administrador de cuentas correspondientes para ese pueblo.
Plantillas de Construcción
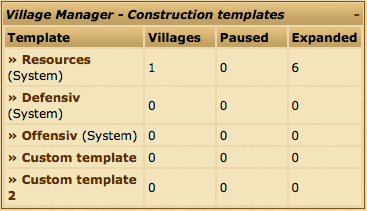
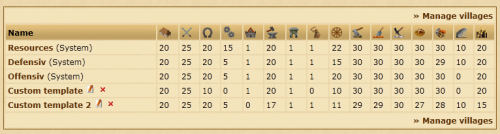
La sección construcción de plantillas del Administrador de Pueblos ofrece una visión general de todas sus plantillas.
Usted puede ver el número de pueblos asignados a cada plantilla,en cuántos de esos pueblos esta en pausa y el número de construcciones que ya se han puesto en cola.
Advertencias y recomendaciones

Si su granja está a plena capacidad o su almacén está lleno, por ejemplo, se le notificará aquí.
Notificaciones
En la pantalla de notificaciones, puede configurar el administrador de cuentas para enviarle un correo electrónico cuando haya nuevos ataques. Para activar las notificaciones de ataque, marcar la casilla que dice "Activar la notificación de ataque". Esto le permitirá ajustar sus opciones.
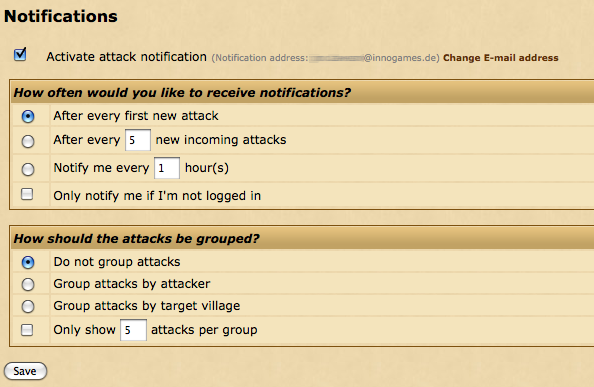
Las opciones se dividen en dos secciones.
¿Con qué frecuencia le gustaría recibir las notificaciones?
La primera parte del formulario controla las condiciones bajo las cuales usted desea recibir notificaciones por correo electrónico para los ataques.
| Después de cada primer ataque nuevo | Se le notificará cuando el contador de ataque entrante se incrementa a 1, de 0. |
| Después de cada (XX) nuevo ataque entrante | Usted recibirá una notificación cada vez que este número(XX) de nuevos ataques son enviados a sus pueblos. |
| Notificarme cada (XX) hora(s) | Usted sólo recibirá una notificación por un número (XX) de horas especificadas. |
| Sólo notificarme si no estoy conectado | Si está marcada, sólo recibirá una notificación si no está conectado en ese momento, o si su cuenta está inactiva. |
¿Como deben ser agrupados los ataques?
Esta parte del formulario controla lo que le gustaría ver que aparezca en las notificaciones de ataque.
| No agrupar los ataques | Los ataques se mostrarán en orden, sin agrupación. |
| Agrupar ataques por atacante | Los ataques se muestran según el nombre del atacante. |
| Agrupar ataques por objetivo | Los ataques se agruparán de acuerdo a pueblo al que se dirigen. |
| Sólo mostrar (XX) Ataques por grupo | La notificación sólo incluye el número seleccionado (XX) de los ataques de cada grupo. |
Administrador de Pueblo
El Administrador de Pueblo se puede utilizar para automatizar las colas de construcción de los edificios en sus pueblos. Usted puede personalizar los niveles exactos de construcción y el orden en que los edificios deben ponerse en la cola utilizando el sistema de plantillas.
Administración de plantillas
Por defecto cuando abres el Administrador de Pueblo se le mostrara la pantalla Gestion de pueblos. Para gestionar sus plantillas debe hacer click en Administrar Plantillas.
Sistema de plantillas
El juego ofrece tres plantillas predeterminadas para su uso. Estas no pueden ser editadaos o eliminadas.
El sistema de plantillas:
* Recursos - Generalmnte pueblo bien construido con énfasis en obtener edificios de recursos a nivel 30 en primer lugar.
* Defensivo - Para los pueblos productores de tropas de defensa.
* Ofensiva - Para los pueblos productores de tropas ofensivas.
Creando su propia plantilla
Usted puede crear su propia plantilla personalizada, si el sistema de tres plantillas no se adapta a sus necesidades. Para ello, rellene un nombre de plantilla en el marco Nombre de la plantilla y elegir entre empezar de cero mediante la copia de una plantilla vacía o copiar una plantilla existente.

Ver, renombrar y borrar plantillas
A continuación de la sección Crear plantilla, encontrará una lista de las plantillas existentes.
Puede hacer click en el icono ![]() para renombrar una plantilla o en el icono
para renombrar una plantilla o en el icono ![]() para eliminar una plantilla.
Nota: El sistema de plantillas no puede ser borrado o renombrado.
para eliminar una plantilla.
Nota: El sistema de plantillas no puede ser borrado o renombrado.
Para ver o modificar el orden plantilla de un clic en su nombre.
Editando una plantilla
Al igual que en la página anterior el Resumen de la sección muestra los niveles para cada edificio.
A continuación de este, la cola de construcción, muestra el orden exacto en que los edificios serán actualizados.
Los elementos de la cola de construcción muestran que el edificio sera mejorado, cuántos niveles debe ser actualizado, y el nivel del edificio después que las mejoras hayan terminado.
Puede eliminar las actualizaciones de la cola haciendo clic en el icono
![]() . Si desea cambiar el orden de la cola puede hacer clic y arrastrar el icono
. Si desea cambiar el orden de la cola puede hacer clic y arrastrar el icono
![]() .
.
However, unlike other sections of the game your deleted/rearranged queues are not immediately saved. You need to click on the "Save" button below to save your changes! You also need to click "Save" after adding new orders to the queue.
You also have the option of letting the Village Manager demolish any buildings that are higher in level than the target levels in your template. The Village Manager will only do so if your Headquarters is at least level 15 and your village is on 100% loyalty.
To add new buildings to the queue use the Add order section at the bottom of the page.
The Village Manager will queue buildings in exactly the order shown on this page. This means if you add 20 levels of Barracks upgrades in one go, then the Village Manager will do all 20 levels in a row before moving on to the next building. If you were to add 2 Barracks levels, then 2 Smithy levels, then repeat 10 times then the Village Manager will upgrade both buildings gradually
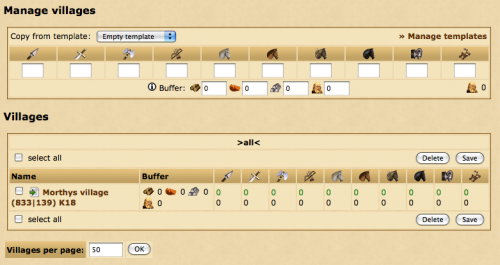
Assigning templates to and managing your villages
You can assign templates to villages and manage general Village Manager operations from the Manage villages screen.
Assigning or removing a template to a village
To assign a template to one or more villages you first need to select them by ticking the check-boxes to the left of the village names.
Then, making sure Use template is selected in the Action drop down box, choose a template for the adjacent list and click Confirm.
You can confirm that the template was assigned by looking at the Status column for the village in question. It should now say Active.
To remove a template from a village you can do the same as above but by selecting Remove from the drop down box.
You can also assign a template to a village by going into the village's Headquarters, clicking on the Village Manager tab and using selecting a template from the list in the Change template section.

Pausing and continuing the account manager
If you want to save your resources in a village then it is possible to pause the Village Manager without having to remove the template.
You can do this in a similar fashion to adding a template to a village, just either select Pause or Continue from the drop down box.
You can also directly click Pause or Continue in the status column for the village.
General notes
The Village Manager will periodically check your building queue and queue new upgrades when possible. It can sometimes take a few minutes for the manager to start queuing buildings after you've assigned a template.
The manager cannot bypass building, population or resource requirements.
If a village's warehouse is not large enough for the next upgrade in the build order to be queued then it will attempt to queue a warehouse upgrade.
Similarly, if the farm is too small it will attempt to queue a farm upgrade.
The village manager allows you to process up to 50 building orders automatically in each village, after which it will pause and you must reactivate it.
Troop Manager
The troop manager allows you to automate the recruiting of units, by choosing how many units you want to build in each village. When resources are available, the troop manager will automatically recruit units for you.
You can apply troop numbers directly to villages, or you can create and save templates to keep for future use, and apply them to villages later.
Using the troop manager to recruit units
In the "Manage villages" panel at the top of the troop manager screen, enter in the number of units you would like to be built in total for one village. You can also set a buffer if you like, to reserve resources or population space. Once you are happy with your input, in the villages panel below check (tick) the villages you would like to apply this troop build to, then click save to start the recruitment process.
If you have created templates (see below for how to do this), you can apply these to villages instead of inputting a new set of unit numbers each time. In the top panel (the "Manage villages" panel), choose the template you want to use from the dropdown list. Then, in the villages panel, check (tick) the villages you would like to apply a template to. Click the save button to apply your chosen template to those selected villages.
It usually takes a few minutes for your troops to start being recruited if you have the resources and farm space available.
Buffer
You can choose to reserve population slots or resources so they will not be used by the troop manager. For example, if you set your population buffer to 100, then 100 population slots will always be kept free and the troop manager will stop recruiting new units when you only have 100 population slots left in your farm.
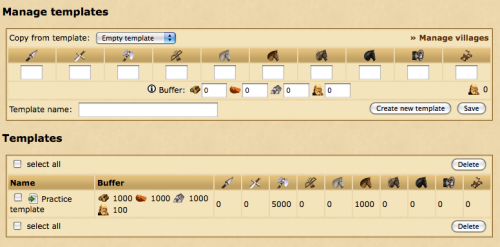
Creating and editing your own templates
To edit templates or make new ones, click the manage templates link in your troop manager. This will bring you to the template editor screen.
Creating a new template
Enter in your desired final troop numbers into the units input boxes, and give it a name in the "template name" field. You can also set a buffer value for this template. Once you have done this, click "create new template" to save the new template.
Editing an existing template
To edit an existing template, click the green edit icon beside the name of the template you want to edit in the templates panel at the bottom of the screen. This will insert the template information into the area above. Adjust the troop numbers and buffer as desired, and then click "save".
Applying templates to villages
Once you have created a template, you will need to apply it to a village to get it to start recruiting units. You can do this from the main Troop Manager screen.
In the top panel (the "Manage villages" panel), choose the template you want to use from the dropdown list. Then, in the villages panel, check (tick) the villages you would like to apply a template to. Click the save button to apply your chosen template to those selected villages.
Deleting templates
To delete a template, check (or tick) the box beside the template name, and click "delete".
Market Manager
The market manager allows you to set up automatic resource transfers between your villages that are sent at predefined times.
Creating a new trading route
Please note that when you create a new trading route the sending village is your currently selected village.
To create a new trading route, either enter the coordinates of the target village in the Destination section or use the Favorites, Your own or History helper links on the right.
Next, input the number of resources that should be transferred in the Resources section.
Lastly, you can choose when the resources should be sent. You can select any of the days of the week and you need to enter the time of day the transfer should be initiated.
Resources will only be sent if the village has enough resources and enough merchants are available.
Viewing and deleting a trading route
Once you have created trading routes you can view a list of them at the bottom of the page. You can see the next scheduled sending time to be sure you've entered the correct days and time.
It is not currently possible to edit a trading route.
To delete routes either click on the delete link next to the route or tick the check-boxes next to the routes you wish to delete then click the Delete button below.
Farm Assistant
The Farm Assistant allows you to easily send farming attacks to barbarian villages around you, either directly from the map or from recent attack reports in the Account Manager overview.
You can create two templates to configure different combinations of troops to send on farming attacks. For simplicity, these are called A and B.
Creating a new template
To create a new template click on New template underneath the Edit Templates section. A new section should appear on the right side of the page.
You can give your template a description to allow yourself to easily identify it in the future.
Once you've entered the desired troop combinations click Save to add the new template.
Editing or deleting a template
If you need to change the description or troops inside of a template you can edit it by clicking on the template description under the Edit Templates' section.
If you'd prefer to delete a template and start over from scratch you can click the red cross to the right of the template description.
Using the Farm Assistant from the map

Once you've set up one or two templates you can now use the Farm Assistant on the map. Note that you must have the Context menu enabled.
When clicking on a barbarian village you should now notice new icons labeled A and B. These correspond with the templates you created from within the Farm Assistant area. To send an attack simply click on the icon and the troops will be sent with no confirmation required.
Note that this only works on barbarian villages. It is not possible to attack a player owned village without going to the rally point and confirming the attack.
Using the Farm Assistant from the Account Manager overview

You can also use the Farm Assistant to send troops based on your recently received reports. You can do this from the Most recent plunders widget on the Overview.
The widget will show a list of recently received reports where you have attacked a barbarian village and looted resources.
Like the map, you can click on either A or B to send troops from one of your templates to the village.
There is also a C icon, which has a special functionality and does not relate to any of your templates. Clicking on C will use your most recent scout report to attempt to calculate and send the right amount of troops to loot all of the village's resources. You will receive a popup with the exact amount of troops sent.
You can only use the C icon if you have recently scouted the village.